Creating an online store using WordPress is quite easy with its popular WooCommerce plugin. But all eCommerce stores are not alike, though they seem to have similar features of selling products online. One key difference amongst WooCommerce stores is the product type chosen to list the items for sale –which can be a simple product or variable product (different variations of the same product).
What Are WooCommerce Variable Products?
These are a type of products that you can create for your WooCommerce website in which you can add various options, like product color, size, and SKU. In other words, they are variations of products in terms of specific features, known as ‘attributes’ in technical terms. Generally, there is no limit to how many attributes you can add to a WooCommerce product but depends on your business and the type of products you sell online.
From the customer’s perspective, the final product choice he selects and adds to his cart for purchase based on some distinct attributes is called a product variation or simply, ‘variation.’
With WooCommerce variable products feature, you can offer options to select a variation of the products they want to buy. It is a common feature in most of the eCommerce websites. Particularly for WooCommerce sites, let’s dig deeper into the steps to create variable products.
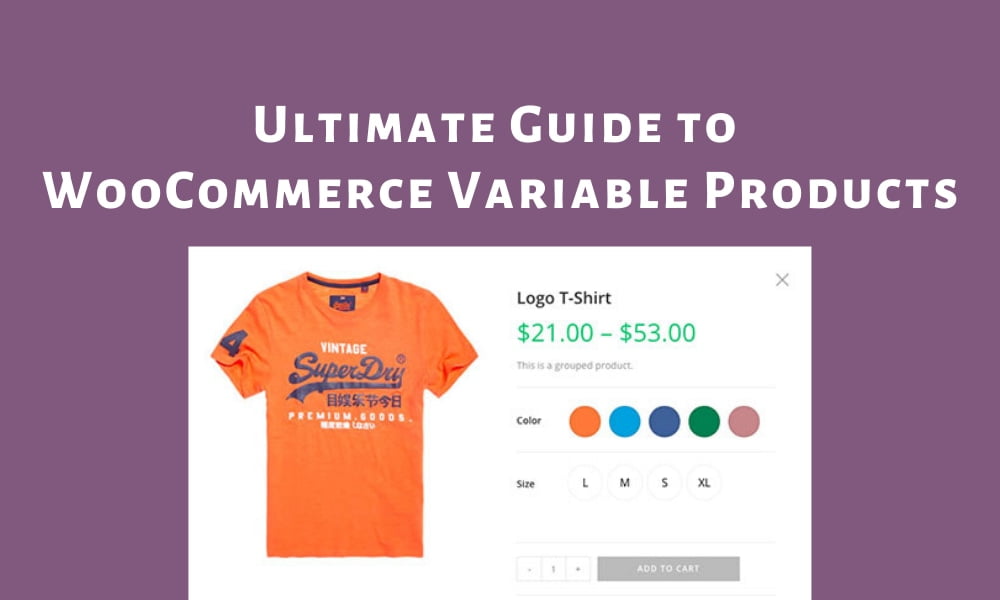
WooCommerce Variable Product Example
Let’s assume that you are selling shoes online, you would need to allow the prospects to buy one specific shoe design in multiple sizes or colors. Tough its the same design, each color variant and size variant of the products have to be stocked and managed individually. So you need to create this shoe as a Variable Product in WooCommerce.

On the other hand, if you sell electronic accessories, say earphones, distinct in feature and type, then you would list each of the unique products separately on your WooCommerce site.
In this in-depth guide, you will get valuable information about WooCommerce variable products and how to create them for your website.
How to Create a WooCommerce Variable Product?
There are several steps towards creating a variable product. Let’s see them step by step:
1. WooCommerce Product Attributes
Product attributes are necessary to create variable products in WooCommerce. Attributes can be things such as Size, Color, etc., As the first step, you need to create product attributes, which are configurable properties of a variable product.
You can apply them later to the existing or new products added to your site. Before moving further, you must know that attributes are of two types:
Global Attributes:
These are added to be used for more than one product available on your WooCommerce site. You can also use them for filtering needs at the shop page of your site. An example of these attributes is Product Size. In general, size is set up as a global attribute because its values can be shared across multiple products.
Custom Attributes:
These are created distinctly for each specific product and cannot be used for multiple products on the website. Also, it is not possible to allow the filtering of products on the shop page based on custom product attributes.
How to Add Product Attributes
While setting up a variable product in WooCommerce, you need to define global attributes first. To do so, here are the steps to be followed:

- Go to Products -> Attributes in your site’s dashboard
- You will see an ‘Add New Attribute’ section just next to the vertical list of dashboard menus. Enter your attribute’s name, which can be Color, Size, etc., in the ‘Name’ field and also can add a ‘Slug’ for the desired URL
- There is a Default Sort Order option in which the attributes can be used in the order they’ve been entered using the ‘Custom Ordering’ or you can sort using Name (Alphabetic), Name (Numeric) or Term ID
- After filling the fields click on the ‘Add Attribute’ button
Configuring and Editing the Attributes
Once you add the attribute, it will start to appear on the right side of the screen, as shown below:
The next sub-step would be to add terms to the create attribute. For instance, if your global attribute is ‘Color,’ then the terms can be red, blue, and others. To do so, here are the steps to be followed:

- In the product attributes page click ‘Configure Terms’ in the list of global attributes
- You will see the left-side form change to ask for ‘Add New Color’
- Enter the first term of your attribute, say ‘Pink’ in the ‘Name’ field
- Click the ‘Add New Color’ button
- Repeat adding new terms as much as you want
This is how you set up global attributes and configure their respective terms.
2. Creating a Variable Product
On adding as many global product attributes as you want, you move a step closer to configuring variable products on your site. Here are the steps you need to follow to add a WooCommerce variable product:

- In your WordPress dashboard under WooCommerce click ‘Products’ -> ‘Add New’
- Scroll down the product detail page to reach the ‘Product Data’ section
- Click dropdown menu of ‘Product Type’ and select ‘Variable Product’ as shown above
At this point, you can add attributes to the product. In the same ‘Product Data’ section, click the ‘Attributes’ tab on the left. However, the process bifurcates from here onward, based on which type of attributes you want to add to your product – Global or Custom. Let’s talk about both these aspects in detail.
Steps to Add Global Attributes
- In the product data section, go to the Attributes tab and click on the ‘Custom Product Attribute’ dropdown to select one of the attributes you have previously created

- Click the ‘Add’ button
- Click ‘Value(s)’ menu to select the attribute value that you want to display in the frontend as product variations or options. You can select more than one value here to create product variations for your WooCommerce website

Steps to Add Custom Product Attributes

- Keep the ‘Custom Product Attribute’ selected in the dropdown and click ‘Add’.
- Enter your attribute’s name in the ‘Name’ field.
- Enter terms name in the ‘Value(s)’ section.
- While adding multiple terms, separate each term with a pipe ‘|’ (use SHIFT + Backslash key on your keyword to get this symbol).
- Tick the ‘Used for Variations’ checkbox for each custom product attribute you include.
- Click ‘Save Attributes.’
3. Steps to Add Different Variations to a Variable Product
Now that you have created a variable product for your site, it is time to add its variations. Keep in mind that a product’s variation is the final product that a customer will add to his cart during the buyer’s journey. Also, each variation should have a price associated with it and is shown as ‘in stock.’ Otherwise, the variations won’t appear on the product page on your WooCommerce site.
Create Single ‘Catch-all’ Variation
While creating variations for a variable product, it is possible to create one variation that can cover all the combinations of added attributes. This method of creating variations is highly useful in many ways, such as to track stock, edit the price and product image of specific variations. Particularly when you want to create SKU numbers for different variations, use this method. Here are the steps to be followed:
- Click on the variable product to edit its details
- Click the ‘Variations’ tab that you can find in the ‘Product Data’ section
- Select ‘Add Variation’ in the dropdown and then click ‘Go’

- Once the variation is created, do not change attribute dropdowns but keep it to ‘Any’ option

- Enter a ‘Regular Price’ for the variation
- Set the variation to ‘In Stock’
- Click ‘Save Changes’
After you have done this, your customers will be able to select the product options while buying it on your site.
How to Create Multiple Variations
For various eCommerce sites, the variations of products also require distinct stock status, stock quantity, or product imagery. For them, you need to create multiple variations, each with different settings.
The steps to create variations this way is the same as the one above, except the fact that you need to select attributes for each variation. In the above-mentioned steps, change the attributes to the one you want to select rather than keeping to ‘Any’ option.
4. How to Create Variations in Bulk
Rather than creating each variation manually, you can make a variation for all possible attribute combinations. The steps to be followed are:
- Click on your variable product to edit it
- Click the ‘Variations’ tab in the ‘Product Data’ section
- Choose ‘Create Variations from all Attributes’ under the ‘Add Variation’ dropdown and then click ‘Go’
- You can create a maximum of 50 variations at a time this way
In case you have created many variations but do not want to set a distinct price for each one at a time, there is a setting in WooCommerce that has you covered. Follow these steps:

- Click the ‘Add variation’ dropdown
- Choose ‘Select regular prices’ option
- Enter the price you want to set and click ‘Ok’
These are the steps to create variable products in WooCommerce. You can do more such as Inventory Management, Discounts, Shipping Methods, Up-Selling, and more with WooCommerce for variable products.
Variation Swatches for WooCommerce By RexTheme

Variation Swatches for WooCommerce is a free variable product plugin that lets you present your product variations in a more attractive way.
Rather than using the default WooCommerce drop-down selection for variations, you can display the variations as swatches on your product pages.
Features of Variation Swatches for WooCommerce
If your products have color variations, you can use the color swatches so your customers can visually see the available colors to choose from.
For your products with size variations, you can use label swatches such as XL or XXL, so that your customers will learn about the available sizes right when they enter your product pages.
An exclusive feature of the plugin is that you can set small image swatch buttons for your customers to choose the right product. Thus making the experience more informed and attractive.
Other features include choosing the swatch shapes, sizes, hover/selection colors, and many more.
The plugin is so easy to use, that you can set up swatches for your product variant attributes in minutes, and then enable the swatch feature in your WooCommerce store with a single click.
Variation Swatches for WooCommerce

Often, the product variations or options do not look good to be shown to the customers in the form of a dropdown. For better user experience, you can create swatches using the WooCommerce variation swatches plugin.
Variation Swatches is an easy-to-use variable product plugin that offers a more engaging user experience for the selection of product options. Using this plugin, you can turn the product variation dropdown menu into labels, colors, or radio images. It also enables swatches to display in the product’s quick view.
Features of Variation Swatches for WooCommerce plugin
- For WooCommerce themes having default Quick View option, there is no need to load image or color swatches for variable product attributes in a quick view using this plugin.
- It also has a premium version with which you can show entire attribute swatches in the category, catalog, store, shop, and archive pages. You can also display a single selected attribute on the same page.
WooSwatches – WooCommerce Color or Image Variation Swatches Plugin

It is a premium WooCommerce variation swatches plugin that supports color, image, and text variation swatches along with dropdown select. You can use this plugin for improved user experience while selecting a product variation on your site. It has been built to work seamlessly on mobile devices as well as desktops.
Features of WooSwatches plugin
Other features you can get with this plugin are:
- Choice of different size of swatches from small to bigger ones
- Square or round swatches available
- Add option name below the swatch
- Changing product image on swatch hover
- Slider for shop swatches
WooCombinator for Variable Products

Swatches are not the only option that you can use instead of dropdowns for variable products. Just like them, there are buttons you can add to the frontend using the WooCombinator plugin. This WooCommerce variable product plugin can help you turn dropdown selection type into clickable buttons.
Features of WooCombinator for Variable Products plugin
Some of its main features are:
- WordPress customizer compatible
- 17+ predefined styles available
- Transition effects available
- Easy to set CSS classes for elements
- The choice to disable the plugin for selected products
- Work on display logic only, not control logic which is handled by WooCommerce
- Included minified CSS and JS files